Diagram + Description
Diagram + My Notes
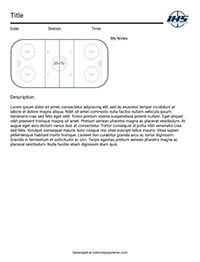
Diagram + Description + My Notes
Bump Back
Bump Back

Set Up
This drill runs out of both ends at the same time.
- Place four equal lines of forwards at the blue lines.
- Opposite lines have pucks with coach as shown in diagram.
- Place pucks at opposite corners.
- Two lines of defense in opposite corners as shown in diagram.
Execution
- On the whistle the coach dumps a puck behind the net.
- D1 skates forward to the dot, transitions backwards, pivots, and retrieves the puck behind the net.
- F1 skates down the wall into breakout position receives a pass from D1 and give a pass right back to D1.
- D1 receives the puck back from F1 and makes a stretch pass to F2 in the neutral zone.
- F2 takes a shot on net, stops for any rebound, and then skates to the corner to retrieve puck #2.
- F2 carries puck up wall and makes a back door pass to F1 as they drive the net.
- F1 stop in front after receiving pass from F2 and then goes to retreive puck #3 from the corner.
- F1 makes a pass to D1 at the blue line and then goes to the net for a screen or tip.
Coaching Points
- Defense work on good footwork on transitions and pivots.
- Stay inside the dots for "Bump Back" from F1.
- F2 needs to control speed and have good timing for stretch pass from D1.
- F1 needs to have good net drive (stick on ice, strong bottom hand)
- F1 needs to take away goalies eyes on D1's shot